Category: UltraTech Services
Finishing of the concrete surface is done after compaction to obtain true, uniform and smooth surface.
There are various steps involved in finishing:
- First step is called Screeding – This is the process of striking off excess concrete using a straight edge. The surface is struck off by moving the straight edge back and forth across the top of the surface. This removes the bumps, hollows and gives uniform leveled surface.

- Next step is called Floating – It removes the irregularities left after screeding and firmly embeds the large aggregate particles. This is done using wooden floats which are moved forward and backward.

- The last step is Trowelling – It is done to obtain very smooth and highly wear resistant surface. It is done using a steel trowel. Trowelling should not be done on a surface that is not floated.

- Spreading of dry cement on wet surfaces should be avoided as it causes weaker surfaces, cracks and blisters.

While placing the concrete, care should be taken to see that it is not segregated, passes through the space between reinforcement and fills the forms completely.

Placing of concrete:
- The stability of the formwork is one of the important aspects to be checked before placing the concrete.

- Any gaps between the shutter plates are to be sealed and cover blocks properly placed.


- The concrete should be placed continuously to prevent formation of cold joints and irregular surfaces.

- The concrete shall be placed against the preceding layers while casting the slab.
- The height of fall while placing concrete shall not be more than 1 metre.
- Chutes should be used for heights more than 1 metre.
- Proper care needs to be taken to ensure that the concrete passes through the congested reinforcement in beams and beam column junctions.

- Concrete may segregate due to the obstruction by stirrups while depositing in columns. It shall be ensured that there is no major obstruction to the flow of concrete.
- Concrete from pans is to be slowly put in place. Throwing concrete from the pan from a shoulder height causes segregation.

- It should not be deposited in front of the vibrator as it moves the concrete away.
- The concrete should be placed within 30 to 45 minutes of discharge.
- Any movement of people should not be allowed till concrete gets stiffened.

Concrete poured must be compacted so that it gives the structure the desired strength and durability.
The method of compaction:
- Freshly placed concrete is to be compacted well to make concrete dense and impervious.
- Compaction can either be done manually or mechanically.

- Manual compaction can be done either by
- Rodding using steel rods
- Ramming using rammers
- Tamping using wooden cross beams. These methods are usually preferred for small jobs.
- Mechanical compaction is done by using vibrators. These are very effective in compacting stiffer concrete, resulting in highly dense and homogeneous concrete which bonds well with the reinforcement.

- Effective compaction enhances the strength and durability.
- In most of the R.C.C. works needle vibrators are used for compaction. Certain care is to be taken while using needle vibrator. Needle of the vibrator should be immersed vertically into concrete and should remain vertical throughout the operation.

- Concrete at a location should not be vibrated for more than 15 seconds.
- The needle has to be withdrawn when the air bubbles seems to appear.
- Vibrator should not be held touching the reinforcement.
- Tube of the vibrator should not be bent at sharp angles to avoid breaking.
- The spacing of the vibrator insertion shall be 15 cm for 20 mm needle and 30 cm for 40 mm needle.

The amount of water used in making of concrete is very crucial in achieving the strength and durability.
Disadvantages of using excess water:
- The amount of water in concrete has significant effect on its properties. For any given quantity of cement and aggregates in concrete, higher the water lesser will be the strength and durability.

- Excess water creates more voids in concrete, making the concrete porous. If porous, harmful gases and chemicals from the atmosphere and soil enters concrete through its pores causing deterioration of concrete.


- Segregation of materials takes place in concrete made with higher water content.

- The concrete becomes non-homogeneous, thereby losing its strength.
- Excess water also tends to come to the surface while compacting and accumulates on the surface. This phenomenon known as Bleeding, makes the surface concrete porous and weaker with lesser wear resistance.

- Higher amount of water in concrete also causes shrinkage cracks.

- The ideal water content for a bag of cement shall be in the range 20 litres to 27 litres of water per bag of cement depending upon the exposure conditions of concrete.
- The usage of optimum quantity of concrete results in cohesive, denser and impervious concrete.


The quality of water plays a vital role in the production of concrete because impurities may interfere with the setting, strength and durability. Hence it is important that the quality of water is checked before being used in the making of concrete.
Important parameters of water quality:
- Water chemically reacts with cement and results in setting and hardening. It lubricates the cement and aggregates in the concrete mix making it workable.

- Generally the water fit for drinking is suitable for making concrete. It should be free from organic impurities like algae, suspended particles, and decayed vegetation, harmful salts and minerals.

- It should not be contaminated with sewer water, acids, alkalies or sugar as this would affect the setting and strength gain of concrete.

- There are simple test available to asses the quality of water at site. It is advisable to get the water tested before use for concrete.


- The important parameters to be checked are pH value, alkalinity, hardness, chlorides and total solids.
- It is very important to know that the seawater should not be used for making reinforced cement concrete.
- The excess chloride content in seawater initiates corrosion of reinforcement.

Concrete mixing in a mixer is most efficient and produces better quality concrete at a faster rate.
Some important aspect of mixing concrete in a mechanical mixer:
- The concrete needs to be mixed thoroughly to ensure that the mass becomes homogeneous, gets uniform color and consistency, so essential for the production of consistent quality of concrete.

- The size of the mixer should accommodate the ingredients of 1 batch.
- 200 litres mixers are the most popular.
- The mixer shall be kept clean, free from dents on inner surface and the blades should be properly aligned.

- Since the materials are proportioned by volume, care should be taken while measuring the ingredients.

- The farma boxes or any other standard measures like buckets or ghamelas should be of the same size and they should be filled to the same level.


- 1/4th quantity of water is to be poured into the drum first, it should be followed by 1/2 the quantity of coarse aggregate and sand and then full quantity of cement. Then the remaining quantity of aggregates, sand and water are added.


- For mixer fitted with hopper, stone aggregates are placed first, followed by sand and cement into the hopper.

- The ingredients are to be mixed for at least 2 minutes before discharging . This is counted from the moment all the water is added into the drum.


Fresh concrete needs to be kept in its intended shape till it hardens. Formwork achieves this purpose.
The best practices to set up the form work:
- Good formwork should be rigid with sufficient number of supports to withstand all the loads till the concrete hardens.

- Even tough there are different varieties of formwork, the generally used formwork in house building segment is made of wood and steel.
- Thee wooden ballies or props supporting the formwork should be kept truly vertical.

- The ballies should be 100 mm diameter at the mid height and 80 mm diameter at the end.
- They should have the spacing of not more than 1 m c/c and should rest on firm base.

- The wooden planks or the mild steel sheets forming the centering are to be properly aligned to the required levels and dimensions.
- The gaps between the planks or sheets are to be sealed with mastic tape to prevent the leakage of slurry.
- The soffits and sides of the beams are to be firmly held by suitable clamps or any other arrangement.

- A thin film of shuttering oil or grease shall be applied on the surface of the formwork to ensure easy deshuttering.

- Before placing the concrete, saw dust wooden chipping, paper pieces, etc., if any are to be removed from the formwork.
- The shuttering of the vertical faces of the beams should be removed first, followed by shuttering forming bottom of slabs, lastly shuttering forming bottom of beams should be removed.
- The centering upto a span of 4.5 m can be removed after 7 days and centering span over 4.5 m to be removed after 14 days leaving the props below the beams which should be removed after 14 days.

Detailing of reinforcement assumes greater significance as poor detailing makes an elaborate analysis worthless. Good detailing ensures that the reinforcement behaves as designed and the structure will become strong and durable.
- There should be sufficient horizontal distance between the rods so that biggest size of aggregate in concrete can pass through.

- The distance between the parallel bars in a beam shall not be less than 25 mm.

- Stirrups or rings in beams are very important. The number of rings, position and spacing shall be as required by the engineering design. Please get the main reinforcement as well as rings checked by a professional engineer. The same importance for the number, position and spacing of reinforcement bars in slabs shall be given.
- The location of bending up the bars and proper trial and provision of cover blocks and chairs for top rods shall be inspected by a professional engineer before concreting.
- Lapping of main reinforcement in slabs and beams shall be avoided at mid span.

- The size of the rods in column shall not be less than 12 mm dia and there should be minimum 4 rods in rectangular columns and 6 rods in circular columns.


- The horizontal distance between vertical rods in a column shall not exceed 300 mm.
- Ensure that the column reinforcement cage is held in vertical position till concreting of foundation.
- The diameter and spacing of lateral tie bars generally called as rings shall be as per the drawing and shall be checked by a professional engineer.Please note it is advisable to have rings at closer spacing where vertical rods are lapped.

- Lapping of longitudinal bars in a column shall be staggered and not more than 50% of the bars shall be lapped at any location. Lapping can be done by tying the vertical rods with lap length as per design or two rods can be welded to save lap length.

- In columns and beams the lap length shall be as per design.
- Longitudinal bar of a column that goes into the footing shall be bent to a minimum length of 300 mm to enable stability of the reinforcement cage till foundation is concreted.


The cover provided by the concrete to the reinforcement bars is very important to ensure corrosion free long life of the structure. Let us see some details on cover to reinforcement:
- The cover is the minimum clear distance from the reinforcement to the face of concrete. It is measured from the outer edge of stirrups or ties for beams and columns to the outer surface of concrete.

- It protects reinforcement from corrosion and provides resistance to fire damage.

- The cover enhances the durability of the structure.
- Cover distance is ensured by providing cover blocks between the reinforcement and shuttering before pouring concrete.

- The thickness of the cover varies depending on the type of exposure that the concrete has with surrounding environment.
- If the concrete is exposed to marine or aggressive surroundings or if it is inside the soil having harmful chemicals, higher covers should be provided.

- More cover is to be provided if the concrete has to withstand accidental fire for longer duration.
- Cover thickness can range from 20 mm to 75 mm.
- The cover concrete should be dense and impervious.
- Stone chips, tiles pieces, etc., should not be used in place of concrete or good quality PVC cover blocks.
- In slabs the spacing of the cover blocks should be such that the reinforcement does not sag in between and touch the shutter plate under the load of concrete.

Columns carries the load of the structure and hence they are critical. It is important to align them for verticality, so that load is transmitted properly.
The column shuttering should be strong enough to take the pressure of fresh concrete and remain in position during concreting. Here are some tips on column shuttering:
- To hold the concrete shuttering firmly in place with proper alignment, a concrete pad called starter is cast before fixing the shuttering. The thickness is about 45 mm to 60 mm and dimensions are precisely the same as the dimensions of the proposed column.
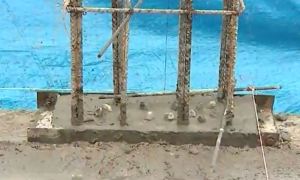
- The starter should be cured for a day or two, so that it is hard enough to fix the shuttering around it.

- Column box or shuttering for column is made of plywood sheets or steel sheets fabricated with adequate battens and stiffeners.

- A thin film of oil or grease should be applied to the inner surface of shuttering to enable easy removal of the column box after the concrete hardens.
- Shuttering should be properly aligned to its verticality and diagonals shall be checked to ensure accuracy in dimensions.

- It has to be thoroughly supported with props or ties before pouring the concrete, so that it does not move horizontally or vertically during concreting.

- The gaps near the shutter joint should be sealed to prevent any leakage of slurry.

- Appropriate space is to be provided between the inner face of the shutter and reinforcement by fixing cover blocks.

- It is preferable to remove the shutters after 24 hours of casting and they need to be removed earlier, it should not be before 16 hours.

- The removal of shutters has to be done gently and without jerks and hammering, so that the edges of the columns are not damaged.

Sand is a vital ingredient for making concrete and mortar.The indiscriminate mining of sand from river bed is threatening the environment which necessitates an alternative material to river sand. Manufactured sand produced using state of the art technology is found to be most suitable alternative.
The process of manufacturing sand consists of three stages viz., crushing, screening and washing.
- Hard stones are crushed in vertical shaft impact crusher where cubical and fine angular particles are produced due to the attrition.


- The process of screening helps in proper grading of the material to make it similar to the river sand.


- The micro fine particles are removed by washing.

- This sand is vastly different from that of crusher dust. Use of crusher dust affects the quality of concrete.

- The concrete made with manufactured sand exhibits good cohesion, workability and attains the compressive strength similar to the property of concrete made with river sand. Infact it exhibits slightly better in compressive strength.


- The performance of mortar made with manufactured sand is comparable to the mortar made with river sand in masonry and plastering.


Fine aggregates are of sizes ranging from 4.75 mm to 150 µ. The quality of fine aggregates greatly affects the quality of concrete. Assessing the quality of fine aggregates:
- Natural sand, manufactured sand and crushed gravel are different varieties of fine aggregates.

- Sand should be hard, clean and free from adherent coatings, organic matter, etc.

- Fine aggregate should not contain more than 5% of silt, clay lumps and chemical impurities. The silt content should not be more than 3% for river sand and 15% for manufactured sand.


- These materials adversely affects the hardening, strength and also durability of concrete by initialization of corrosion of reinforcement.

- Any organic impurities like leaves, grass roots, decayed vegetation will interfere with setting and binding properties of concrete.
- Sea sand should not be used as it causes efflorescence, corrosion of reinforcement and retards setting and hardening of concrete.
- Damp sand exhibits more volume. This is called bulking. when the damp sand is measured by volume, up to 15% of extra sand is to be added to compensate for bulking.


- Sand should be so stacked that dust and other foreign matter are prevented from getting mixed with it.

- Due to adverse impact on environment by rampant mining of natural sand, the government is encouraging the use of manufactured sand which is satisfactory for making concrete. Manufactured sand is scientifically produced in specially designed crushers to ensure the compliance with national standards. Users should not be confused between manufactured sand and crusher dust. Crusher dust is the waste product from manufacturing of coarse aggregates which has very high silt content and fine particles.

The brick is one of the oldest construction materials known to man.
The quality of brick plays a vital role in imparting strength and durability to brick walls.
Inferior quality bricks not only reduce load carrying capacity of brick walls but also affects its aesthetics.
Let us see some of the field tests that can be used to check the quality of bricks at site:
- Good quality bricks should be well burnt with uniform shape, size and color.

- The color of the brick is generally deep red or copper, homogeneous in texture and free from flaws and cracks.

- They should square, straight and sharply defined edges.
- They should be hard and should give metallic ringing sound when struck with each other.

- They should not break while striking against each other or when dropped from a height of about 1.2 m to 1.5 m on to the ground.

- The water absorption should not be more than 1/6th of its weight after immersion in water for 1 hour.


Among the various types of aggregates used in the making of concrete those which are above 7.5 mm and upto 80 mm are called coarse aggregates. Some pointers are elaborated for choosing the quality:
- The aggregates with rough and non glossy surface are considered the best as the develop good bond with cement paste.

- They are gravel or broken stones and should be chemically inert, hard strong, non porous.
- Dirt coating and organic matter may impair the strength and durability of concrete and hence should not be present in excess quantity.

- Aggregates should not absorb water, more than 10% of their weight after immersion in water for 24 hours. Those which absorb more water are porous aggregates and are not desirable to be used in making concrete.

- Flaky/thin, elongated/long aggregates should not be more than 35% by weight of the total quantity..
- For getting the best performance of concrete, angular and roughly cubical aggregates are ideal.
- The aggregates should contain different size fractions to ensure good packing of particles, thus reducing the voids and increasing the density of concrete.
- For most of the concrete works, 20 mm and down size of aggregates are used.

- To ensure all the size of fractions are present in aggregate, 20 mm and 10 mm aggregates may be combined in the ratio of 60:40 or 70:30.
- Ideally aggregates of different sizes should be stacked separately for better management.


Chemical admixtures have become one of the essential component of concrete in recent years. They are important because they help in achieving the desired properties of concrete. Let us see the effect of Superplasticizer on cement paste:
- Chemical admixtures are chemical compounds other than cement, water and aggregates added to the concrete mix either just before or during mixing to modify one or more properties of concrete.


- The most commonly used admixture are plasticizers and superplasticizers which have the ability of increasing the flowability of concrete considerably without increasing water content.

- A cement paste is prepared with certain proportion of cement and water. You can see that the paste is stiff.


- Now to the same amount of cement and water, thee superplasticizer is added. You can see how it has made the cement paste to just flow like pourage.


- In the same way concrete also becomes more flowable with the addition of superplasticizer.

- Superplasticizer is added to increase the flowability of concrete with lesser amounts of water. This facilitates easy placing and compaction of the concrete. It is well known that reduction in water increases the strength and durability of concrete. Hence plasticizers and superplasticizers are widely used.
Cement concrete blocks have become popular and are extensively used in construction now-a-days.
- These blocks can be used for both load bearing and non load bearing walls
- The blocks shall be visually checked for dimensions, broken edges, cracks and honeycombing as they may reduce the strength.


- Normally good quality concrete blocks exhibit better and consistent strength as compared to clay bricks.
- The use of good quality concrete blocks consumes lesser cement mortar for joints and plastering. The savings may be around 20%.

- The construction would be faster as each concrete block replaces about 7 to 8 clay bricks and the number of joints are less.
- These blocks provide good backing and strong bond for plastering.
- Water absorption of these blocks are relatively lower than clay bricks.

- Most importantly cement concrete blocks are environmental friendly as precious fertile soil used by clay bricks is conserved and carbon emission due to inefficient burning of clay brick is avoided.

For a wall to be strong and take the loads, it is essential to arrange the bricks or blocks properly, maintaining suitable joint thickness.
Let’s see the right method of building with bricks or blocks:
- Before using bricks or blocks in masonry construction, they should be soaked in water for minimum 1 hour or at least they should be sprayed with water till the brick or block ceases to absorb water.


- For masonry works we should use cement mortar having 1 part of cement with 6 parts of sand.
- The bricks shall be laid in alternate header and stretcher pattern on full bed of mortar. In case of block masonry, there would be only stretcher course.

- All the courses of the masonry shall be laid truly horizontal.

- The vertical joints shall be truly vertical and shall be staggered.

- The joints shall be fully filled and packed with mortar having thickness not more than 12 mm.

- They should be raked down to a depth of at least 12 mm to form key with plaster.

- While constructing half brick partition walls or 100 mm thick walls, it is advisable to place 6 mm diameter rebar in every 4th course within a concrete band.
- The masonry wall shall not be raised for more than 1 m height in a day.
- It shall be cured well for a period of 10 days.


